

close
Choose Your Site
Global
Social Media


Views: 0 Author: Site Editor Publish Time: 2026-08-08 Origin: Site


Off-the-shelf wall moldings routinely fail when applied to non-standard architectural spaces. Builders often encounter frustrating alignment issues, resulting in high labor expenditures, wasted materials, and compromised aesthetics. Trying to force standard panels into unique rooms creates more problems than it solves.
Tailoring mold configurations is no longer just an upscale luxury for commercial environments, historic renovations, or high-end residential builds. It stands as a strict baseline requirement for achieving seamless visual integration. Precision engineering ensures your walls align perfectly with ambitious design goals. Exact dimensions allow panels to withstand complex environmental demands without visible seams or awkward gaps.
This comprehensive guide provides an actionable framework for evaluating custom-sized interior wall systems. We will compare distinct configuration approaches and highlight strategies to mitigate implementation risks before you commit to any manufacturer. You will discover exactly how to guarantee flawless installation outcomes and shift your strategy from reactive on-site modifications to proactive design precision.
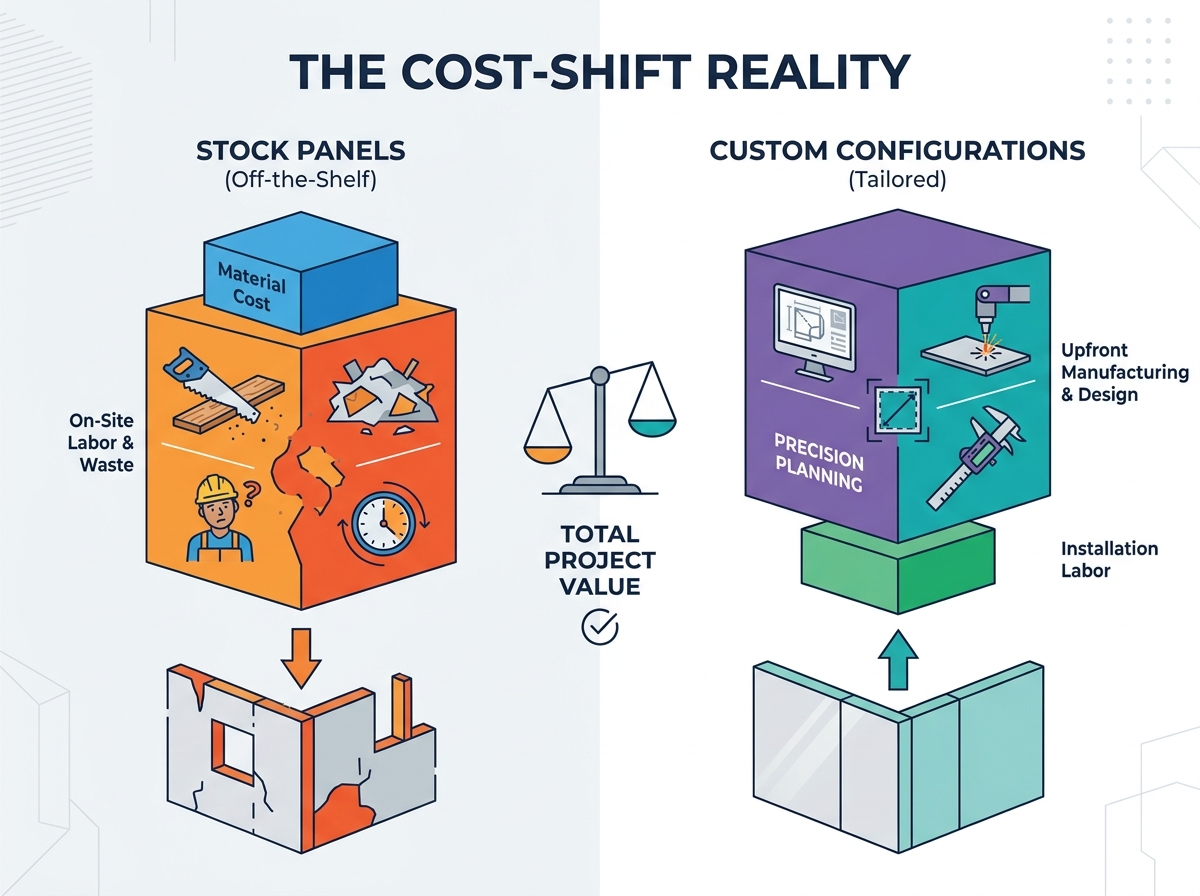
Modifying stock panels on-site introduces a host of hidden expenses. Carpenters spend countless hours measuring, cutting, and adjusting standard panels to fit non-standard rooms. You pay heavily for this skilled labor. Compound mitering errors frequently occur when dealing with uneven corners. A single miscalculation ruins an entire panel. This generates structural waste and delays project timelines. Off-the-shelf products force your team to become makeshift manufacturers on the job site. Dust fills the room. Noise disrupts other trades. Frustration builds as workers struggle to adapt rigid materials to fluid architectural realities.
We define a successful custom implementation by three strict criteria. First, it requires zero-waste installation. Every panel arrives cut exactly to size. Second, it achieves perfect scale-to-ceiling ratios. Designers do not have to compromise their vision because standard heights fall short. Third, it guarantees seamless joint alignment. Panels interlock flawlessly, eliminating the need for excessive caulk or wood filler. These outcomes signify true architectural integration.
Adopting custom configurations introduces a distinct cost-shift reality. Custom panels undeniably carry a higher initial product cost. You pay for engineering, precision tooling, and specialized shipping. However, they reliably compress installation timelines. You dramatically reduce your dependency on highly specialized carpentry labor. Instead of paying craftsmen to cut and adapt materials, you pay installers to simply place and secure them. This predictable workflow prevents budget overruns and accelerates the overall completion schedule.
Selecting the right configuration approach determines the success of your installation. Different projects demand different levels of customization. We categorize these approaches into three distinct pathways.
| Approach | Best Use Case | Primary Advantage | Main Limitation |
|---|---|---|---|
| Made-to-Measure Pre-Cut Kits | Symmetrical rooms, advanced DIY | High convenience, lower shipping costs | Limited to standard profile shapes |
| Fully Bespoke Architectural Molds | Historic renovations, curved walls | Ultimate design flexibility | Longer lead times, high tooling costs |
| Modular Scalable Systems | Rapid commercial deployments | Balances customization and speed | Less fluid than completely bespoke |
Choosing the correct material dictates the lifespan and performance of your design. You must map specific materials directly to their intended environmental outcomes. A mismatched material quickly leads to swelling, cracking, or impact damage.
Precision and tight tolerances separate professional fabrications from amateur attempts. Industry standards typically demand a margin-of-error no greater than +/- 1/16 inch. Anything larger creates visible gaps requiring excessive filler. Manufacturers must account for out-of-plumb walls. Drywall is rarely perfectly flat. Engineered reveals and adjustable shimming ledgers help absorb these architectural realities.
Compliance and safety remain non-negotiable for commercial interior wall systems. Ensure your chosen material carries a Class A fire rating, adhering to standards like ASTM E84. This rating dictates flame spread and smoke development. Additionally, verify low-VOC (Volatile Organic Compound) emission standards. Many modern green building frameworks, including LEED, strictly limit the off-gassing allowed from paints, adhesives, and composite panels. Protect your occupants by insisting on certified materials.
Moving from a visual concept to a physical installation involves significant risk. The bulk of this risk lives in the specification phase. You mitigate these dangers through rigorous documentation and disciplined measurement protocols.
Never order custom configurations without comprehensive CAD or 3D rendering sign-offs. This virtual design plan bridges the gap between deliverables and demand. A reliable design plan must include specific elements. It requires detailed elevation views showing exactly how panels interact with baseboards and crown moldings. It must map out precise joint placements to ensure seams fall logically around windows and doors. Finally, it needs numbered panel schematics. Installers should open a crate and know exactly where panel number four belongs.
Inaccurate site measurements represent the most common failure point. We call this the measurement trap. Relying on a simple tape measure for a complex, non-standard room guarantees errors. We highly recommend utilizing laser-measuring protocols. 3D laser scanning captures the exact topography of the room. You must also define baseline assumptions. Assume floors are uneven. Assume ceilings sag. Your design plan must incorporate scribe moldings or adjustable bases to absorb these inevitable imperfections. Do not expect the architecture to conform to the panel.
Logistics and lead times require honest evaluation. Frame a realistic timeline from the approval of tooling to final delivery. Fully bespoke molds often take several weeks just to prototype. Transit damage poses a massive risk for oversized panels. Audit a vendor's packaging protocols before signing a contract. Ask how they crate their shipments. Do they use rigid edge protectors? Do they ship via dedicated LTL (Less Than Truckload) freight carriers? A beautifully milled panel becomes worthless if a forklift punctures it during transit.
Selecting a manufacturing partner goes beyond comparing price tags. You are hiring an engineering extension of your team. Their internal processes directly impact your final installation quality. Evaluate candidates across three critical dimensions.
First, scrutinize their design engineering support. Do they merely cut to your provided numbers, or do they actively review schematics for structural viability? A good partner will push back if your requested panel span risks sagging. They should identify potential collision points around HVAC vents or electrical outlets. You want a vendor who engineers solutions, not one who blindly feeds dimensions into a CNC machine.
Second, evaluate their sample and prototyping policies. Never buy a custom system sight unseen. Reputable manufacturers gladly provide profile cross-sections. They should offer corner-block prototypes before running full production. Holding a physical sample allows you to verify the crispness of the milled edges. It lets you test paint adhesion and assess the actual weight of the material. If a vendor refuses to supply a prototype, eliminate them from your shortlist immediately.
Third, carefully examine their warranty and revision terms. Read the fine print regarding remake policies. If configurations arrive out of spec, who pays for the replacement? A trustworthy vendor guarantees their tolerances. If they mill a panel incorrectly, they should expedite a replacement at their own expense. However, if your initial measurements were wrong, you will bear the cost. Clarify these boundaries before production begins. Understand exactly how they handle shipping damage claims to avoid prolonged project delays.
Tailored mold configurations effectively remove the guesswork from complex room installations. Success relies entirely on your rigorous evaluation of materials and precise spatial mapping. You cannot bypass the preparation phase without suffering consequences on the job site.
For non-standard architectural spaces, the initial investment in custom-sized interior wall systems mathematically outperforms the chaotic, labor-intensive modification of stock goods. You trade unpredictable on-site carpentry for guaranteed factory precision. This swap protects your schedule and elevates the final aesthetic.
Audit your current project blueprints immediately. Lock in the environmental material requirements for each specific zone. Next, request detailed virtual design plans and physical prototypes from your top two vendor candidates. Make your final selection based on their engineering rigor and transparency.
A: Custom systems absorb architectural imperfections through engineered tolerances designed directly into the plans. Manufacturers incorporate scribe moldings, which installers can shave down on-site to match a wavy wall. They also use adjustable reveals and floating bases. These clever design features hide gaps caused by unlevel ceilings or sloping floors, ensuring the final visible surface appears perfectly plumb and square.
A: A realistic lead time typically ranges from 4 to 8 weeks, heavily depending on tooling requirements and material availability. Pre-cut standardized profiles arrive much faster. However, newly tooled architectural molds require time for CAD approval, prototype creation, and physical casting. Always factor this manufacturing window into your master project schedule to prevent staging delays.
A: Yes, custom pre-cut panels are highly viable for advanced DIY projects. The key requirement is that the system includes a numbered installation schematic. You must also properly prep the substrate beforehand. Precision ordering shifts the difficulty away from complex carpentry and cutting. Your primary focus becomes surface preparation, leveling, and securely adhering the precisely sized pieces to the wall.
A: Materials for tailored configurations generally cost 20% to 40% more upfront than standard stock panels. However, total project costs often neutralize or ultimately favor custom solutions. This balance occurs because custom panels drastically reduce the highly specialized carpentry, compound mitering, and finishing labor required on-site. You pay more for the product, but significantly less for the installation time.


